Most of the time while working with real-world applications you would have to use arrays, objects, or an array of objects as states. In this blog, we will be implementing the add note, pin, unpin feature of Google Keep app with just useState hook.
Prerequisites:
Knowledge of higher-order functions like map, filter
Working of
useStatehook. Check out my previous blog in which I have covered the working in detail. Here is the link to the blog
https://janaki2399.hashnode.dev/understanding-usestate-hook-with-a-real-world-example-part-1
Let's get started

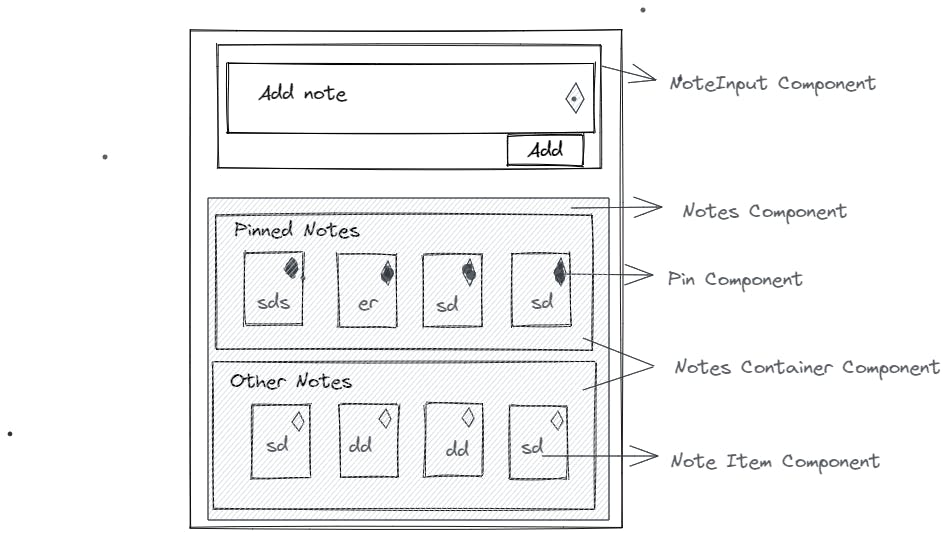
Let us split the app into multiple components - NoteInput, Notes which can be further split into NoteContainer component for pinned and unpinned notes. Since Pin is common in all components we can extract it out as a separate component.
We could have one state for the notes list which would be an array of objects. Each object is a note. Let us initialize this array with one note to understand the structure better.
const [notes, setNotes] = useState([
    {
      id: v4(),
      text: "imp",
      isPinned: false
    }
  ]);
Each note should have an id to identify it uniquely. I have used uuid package to generate unique ids. We can have an isPinned property to know if a note is pinned or not.
export default function App() {
  const [notes, setNotes] = useState([
    {
      id: v4(),
      text: "imp",
      isPinned: false
    }
  ]);

  return (
    <div className="App">
      <NoteInput setNotes={setNotes} />
      <Notes notes={notes} setNotes={setNotes} />
    </div>
  );
}
NoteInput and Notes components are inside the App component. Hence these are the sibling components. In order to share the state between sibling components, we need to lift the state up.
So we would have the notes state in the App component and pass it via props to all the child components.
export const NoteInput = ({ setNotes }) => {
  const [text, setText] = useState("");
  const [isPinned, setPinStatus] = useState(false);

  const addNote = () => {
    const note = {
      id: v4(),
      text,
      isPinned
    };
    setNotes((notes) => notes.concat(note));
    setText("");
    setPinStatus(false);
  };

  const changePinStatus = () => {
    setPinStatus((previousState) => !previousState);
  };

  const handleChange = (e) => {
    setText(e.target.value);
  };

  return (
    <div className="notes-input">
      <textarea
        className="notes-textarea"
        placeholder="enter notes"
        value={text}
        onChange={handleChange}
      />
      <Pin isPinned={isPinned} pinAction={changePinStatus} />
      <button onClick={addNote}>Add</button>
    </div>
  );
};
We have two states in the NoteInput component. When the pin button is clicked we toggle the isPinned state.We create a note object and append it to the notes list on clicking on add button along with pin status.
We have extracted Pin as a separate component but the action to be performed on the pin is different in each component.
In the NoteInput component, we would have to just toggle the state but in the NoteItem component, we would have to update the isPinned property of the note object.
In order to handle different functionalities, we have to define them in the parent component.
It can be called back in the Pin component.
export const Notes = ({ setNotes, notes }) => {
  const pinnedNotes = notes.filter((note) => note.isPinned);
  const otherNotes = notes.filter((note) => !note.isPinned);

  return (
    <>
      {pinnedNotes.length > 0 && "Pinned notes"}
      <NotesContainer notes={pinnedNotes} setNotes={setNotes} />
      {otherNotes.length > 0 && pinnedNotes.length > 0 && "Other notes"}
      <NotesContainer notes={otherNotes} setNotes={setNotes} />
    </>
  );
};
In the Notes Component , we can filter out the notes according to the pinStatus(pinned or unPinned) and pass the filtered notes to the two containers.
export const NotesContainer = ({ notes, setNotes }) => {
  return (
    <div className="notes-div">
      {notes.map(({ id, text, isPinned }) => {
        return (
          <NoteItem
            key={id}
            noteId={id}
            text={text}
            isPinned={isPinned}
            setNotes={setNotes}
          />
        );
      })}
    </div>
  );
};
The NotesContainer component is used for displaying the pinned and unpinned notes. It is a good practice to destructure the parameter in the callback of the map function.
export const NoteItem = ({ noteId, text, isPinned, setNotes }) => {
  const handlePinAction = () => {
    setNotes((notes) =>
      notes.map((note) =>
        note.id === noteId ? { ...note, isPinned: !note.isPinned } : note
      )
    );
  };
  return (
    <div className="note-item">
      <div>{text}</div>
      <Pin noteId={noteId} isPinned={isPinned} pinAction={handlePinAction} />
    </div>
  );
};
We need to define the pin action for the NoteItem Component (the functionality is a bit different from the pin component in NoteInput Component)
export const Pin = ({ isPinned, pinAction }) => {
  const iconBtn = isPinned ? (
    <span className="material-icons">push_pin</span>
  ) : (
    <span className="material-icons-outlined">push_pin</span>
  );

  return (
    <button className="icon-btn" onClick={pinAction}>
      {iconBtn}
    </button>
  );
};
In the Pin component the icon button is toggled according to isPinned status and on clicking the icon pinAction is called
Live demo demo link
The complete code could be found here Keep Notes
Conclusion
In this blog, we have just implemented the pin unpin feature to understand how the
useStatewith objects works but when the app grows bigger for instance when you add delete, color, tag functionality so on there would be lots of states to handle. For that useReducer hook would be a good option.Also, you might have noticed there is prop drilling when you passed
setNotesdown to multiple components. SouseContextwithuseReducerhook would be a good option if you would like to implement multiple features.
Happy learning. I would love to connect with you on Twitter Linkedin.